Steampunk Interior Design: Materials and Proportion First

Steampunk interior design tempts people to buy gears first and ask questions never. I have walked into client rooms that looked like prop warehouses because nobody checked ceiling height against a brass chandelier the size of a dining table.
The style works when you treat it as a material and proportion problem: dark wood case goods at human scale, metal as trim not wallpaper, leather with real grain instead of shiny vinyl. I specify those three before anyone mentions airships.
In Chicago I often adapt steampunk cues for urban apartments that already have brick and steel. The architecture does half the job. My job is to stop the decor from shouting over it.
Victorian Proportion in Modern Rooms
Steampunk interior design borrows nineteenth-century verticality: tall backs, substantial bases, crown that reads even when it is paint-grade. I measure ceiling height before I specify any tall clock or gear sculpture.
Furniture should feel anchored. Light-legged everything makes steampunk look like stickers on a contemporary shell. I mix one heavy piece per zone: a solid console, a leather club chair, a thick-legged desk.
Sightlines from entry matter. If the first object is a novelty gear wall, the room reads theme park. I place the heavy visual weight off-axis so circulation stays clear.
Double-check door swing and radiator clearance before you fall for a wide Victorian reproduction. Proportion includes the air around furniture, not just the piece itself.
Metal: Accent, Not Armor
Brass, copper, iron, and steel belong at edges: lamp bases, switch plates, shelf brackets, fireplace tools. Steampunk interior design collapses when every surface is metallic.
I mix warm and cool metal on purpose in one room, not by accident. One dominant temperature plus a secondary note reads collected. Random chrome and brass fights itself.
Patina is your friend. Polished brass everywhere shows fingerprints and feels hotel lobby. Brushed or aged finishes forgive daily life in real apartments.
Avoid literal gear stacks unless they are sculpture-scale and singular. One machined object on a mantel reads art. Twenty gears on a shelf reads junk drawer.
Leather, Wood, and Textile Balance
Leather should be matte and supple. Shiny pleather kills the workshop story instantly. I specify full-grain or quality vegan alternatives with low gloss.
Wood tones need hierarchy: walnut or oak case goods, lighter trim, dark leather seating. Steampunk interior design is not orange pine beside cherry beside espresso laminate.
Textiles add softness without feminizing the whole room unless that is the brief. I use wool throws, tweed pillows, and heavy drapes that stack back cleanly.
Rugs ground metal and leather. A worn oriental or simple jute defines the seating zone so chairs do not float on bare floor.
Lighting: Warm Glow, Visible Source
Steampunk interior design expects you to see where light comes from: filament bulbs in clear glass, shaded bankers lamps, picture lights on art. Hidden LED strips alone feel wrong for the story.
Dimmer circuits are mandatory. I spec warm dimmable bulbs and test at twenty percent. The style lives at low glow, not interrogation brightness.
Pendant scale must respect head clearance. In eight-foot ceilings I choose flush mounts with industrial detail or single drop pendants over tables only.
Layer three heights: floor, table, and one architectural accent. Even industrial rooms need fill light or faces look harsh in conversation.
Layout for Real Use, Not Display
Work zones and living zones still need paths. I keep steampunk desks against walls with cable management planned, not draped like set dressing.
Open shelving displays curated objects, not every purchase. I rotate three to five items per shelf and store the rest. Density reads hoarding fast.
Connect proportion habits to design basics when clients inherit odd room shapes. Steampunk does not forgive bad circulation.
Media integration needs a plan. A TV on a metal arm can work if cables are channeled. A TV surrounded by fake pipes does not.
Chicago Loft and Apartment Adaptations
Exposed brick and steel beams already signal industrial bones. Steampunk interior design in lofts should subtract before it adds. I often remove conflicting trendy decor first.
For smaller bedrooms I shrink Victorian cues: headboard height yes, four-poster no. One bankers lamp, one leather bench, one metal mirror.
Renters use plug-in sconces and heavy drapery to suggest period weight without hardwiring. I document landlord rules before specifying any wall penetration.
When clients want more style references, I send them to interior design styles to compare industrial, Victorian, and eclectic overlaps before they buy duplicate themes.
Art, Maps, and Wall Discipline
Steampunk interior design favors technical art: patent drawings, maps, astronomy prints, engineering cross sections. I frame one large piece per wall instead of salon-style clutter.
Matting should be simple: cream or gray board, thin black frame. Ornate gold fights industrial metal elsewhere unless the architecture is already ornate.
Gallery walls work only with consistent frame family and spacing. Random frame sizes read flea market, not curated study.
I hang at eye center for seated viewing in lounges. Tall narrow art beside doorways can accent verticality without lowering ceiling feel.
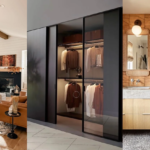
Case Goods and Storage That Look Built-In
Apothecary cabinets, card catalogs, and tool chests provide steampunk interior design storage with honest function. I line heights across one wall for built-in illusion.
Glass-front displays need editing inside. Visible junk destroys the workshop story. Store daily clutter behind solid doors.
Leather boxes and canvas bins on open shelves unify disparate objects. One material repeat saves chaotic collections.
Labeling can be subtle: small brass tags, handwritten tags on string. Avoid joke labels unless the room is literally a bar.
Fireplace and Hearth as Anchor
Where fireplaces exist, steampunk interior design often anchors the room on hearth mass. I mirror that with a media console or sideboard of similar visual weight when no fire exists.
Mantel objects stay in threes: one tall, one wide, one small. More reads prop shelf.
Tools beside hearth or stove should be real and maintained, not plastic props. Fire safety overrides aesthetic every time.
Heat clearance rules apply to art and electronics above mantels. I measure temp rise before hanging anything.
Long-Term Care for Metal and Leather
Brass needs occasional polish on touch points only. Fully polished everything looks new-money, not old workshop.
Leather benefits from conditioner yearly. Dry cracking reads neglect, not patina.
Wood oil on dining surfaces prevents ring panic. Steampunk interior design assumes use, not museum ropes.
Document product codes for clients so maintenance survives designer handoff. Rooms die when no one knows how to care for materials.
Steampunk interior design succeeds when materials feel honest and scale respects the room. Buy one substantial piece, one metal accent layer, and one lighting story before you hunt novelty props.
Stand in the doorway and name the first three materials you see. If the answer is only metal, pull back until wood or leather enters the conversation. See home decor when you want adjacent ideas.
Where Steampunk Usually Breaks in Client Homes
Most steampunk rooms fail the same way: too many small metal objects and not enough calm planes. I have walked into basements where every shelf held gears, gauges, and bottle openers. The owners loved the theme. Guests could not find a place to rest their eyes.
In client work I treat brass and iron as accents, not wallpaper. One substantial material story (a radiator cover, a lamp cluster, a table base) beats twenty miniatures. Scale is the whole game. Tiny props read as costume. Large, honest metal reads as architecture.
Lighting is the second failure point. Cool LEDs kill the warm industrial mood overnight. I specify warm bulbs and layered sources: a floor lamp for reading, a wall sconce for height, a table lamp for faces. Overhead-only light turns steampunk into a storage locker.
Budget-wise, I tell people to spend on one good piece of metal furniture or lighting and shop thrift for secondary texture. A thrifted trunk with honest wear outranks a new factory-distressed crate every time. Your hand can tell the difference even when your camera cannot.
If you share the space with someone who hates costume design, agree on a ratio: one statement metal piece per room, everything else quiet wood, leather, or linen. Steampunk as a whisper works in real homes. Steampunk as a shout usually ends in a purge six months later.
A Materials Checklist Before You Buy Brass
Ask whether the metal finish matches existing hardware in the room. Mixing five brass tones reads busy, not curated.
Touch the piece in person when you can. Thin stamped metal rattles. Heavier cast or solid pieces hold the industrial story without looking like costume jewelry at furniture scale.
Plan maintenance. Unlacquered brass darkens. If you hate polishing, choose a finish you can live with after six months of fingerprints.
Leave negative space around the statement piece. Steampunk needs air the same way a machine room needs clearance.
FAQ
Is steampunk only for large lofts?
No, but you must edit scale. Use fewer, heavier pieces instead of many small props.
Can steampunk feel modern?
Yes, when metal is trim and silhouettes stay clean. Avoid costume clutter.
What metals mix best?
Pick one dominant temperature. Brass with iron works; random chrome everywhere does not.
Best first investment?
A quality bankers or arc lamp on a dimmer. It sets tone without eating floor space.
How do I avoid looking like a restaurant theme?
Skip branded novelty signs and gear walls. Let architecture and one sculpture carry the story.